Custom Field Managers Procedures
Administrative users can create custom fields for their users to utilize if they want to collect additional information about workspace records. There is a custom field manager for each workspace in the upgraded software. To learn how to use custom fields, see the Custom Fields Detail Section procedures page.
Note:
You can create an unlimited number of custom fields.
Note:
You can select up to ten of each type (date, text, number, and choice) of custom fields per module to appear in reports in Report Center.
To access the Custom Field Managers:
-
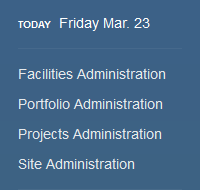
Click the appropriate administration link in the menu on the left side of the window.

Administration links in the menu.
-
The Facilities Administration link opens a window which contains links to:
-
The Portfolio Administration link opens a window which contains links to:
-
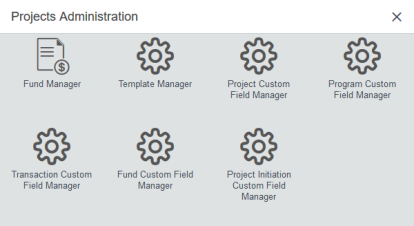
The Projects Administration link opens a window which contains links to:
-
Project Initiation Custom Field Manager
-
Project Custom Field Manager
-
Program Custom Field Manager
-
Transaction Custom Field Manager
-
Fund Custom Field Manager
-
The Site Administration link opens a window which contains links to:
-
Invoice Custom Field Manger
-
Purchase Order Custom Field Manager
-
Building Manager Custom Field Manager
An Administration window opens.
When you click the Projects Administration link, the Projects Administration window opens.
-
Click the appropriate Custom Field Manager button.
Note:
The Custom Field Manager buttons use a gear icon.
The Custom Field Manager workspace opens.
Read the expanding sections below to learn more about how to use Custom Field Managers.
To create a custom field:
-
Follow the steps above to navigate to the Custom Field Manager.
-
Click the Custom Fields link in the Detail Section menu.
The Custom Fields page opens.
-
Click the Add Custom Field button  .
.
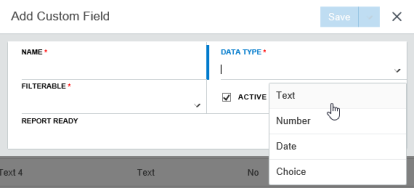
The Add Custom Field modal window opens.
-
Enter a name for your custom field in the Name field.
-
Select the type of data this field will collect from the Data Type field.
-
Text - select this option if you want this field to collect plain-text responses.
-
Number - select this option if you want this field to only allow responses in number form.
-
Date - select this option if you want this field to open a date picker when the user clicks in the field.
-
Choice - select this option if you want this field to be a field with choices for the user to select.
Data Type field.
-
If you selected Choice from the Data Type field, the Choices table opens. Follow the steps below to enter the choices that will be available for your users:
-
Enter the Description of the choice in the Description field.
-
Enter a number in the Sequence field to indicate where in the list this choice will appear.
-
Repeat steps a - b until all choices are entered.
As you enter your choices, more fields appear.
-
Select Yes from the Filterable field if you want this custom field to appear in the Filter Panel, or select No if you do not want this custom field to appear in the Filter Panel.
-
If you want this custom field to be active, leave the Active check box selected. If not, clear the check box.
-
Select a number from 1 to 10 from the Report Ready field. See the note below for more information.
Note:
BIGCenter currently allows up to 10 custom fields per data type per workspace to show up in the reports in Report Center. The Report Ready field indicates whether the custom field you are creating appears in Report Center, and the sequence in which it appears.
-
Choose between two options:
-
Click the Save button.
This saves your custom field and closes the modal window.
-
Click the drop-down arrow next to the Save button and click Save & New from the menu that appears.
This saves the current custom field, clears the modal window of data, and allows you to create another custom field.
Click the Save button once you are done creating custom fields. The modal window closes.
Your custom fields are complete. They appear in the Custom Field Manager page.
To edit a custom field:
-
Follow the steps above to navigate to the Custom Field Manager.
-
Click the Custom Fields link in the Detail Section menu.
The Custom Fields page opens.
-
Select the custom field you want to edit.
-
Click the Edit Custom Field button  .
.
The Edit Custom Field modal window opens.
-
Follow steps 3 - 8 of the Create a Custom Field procedures to make changes to the custom field.
-
Choose between two options:
-
Click the Save button.
This saves your custom field and closes the modal window.
-
Click the drop-down arrow next to the Save button and click Save & Next in the field.
This saves the current custom field and opens the next custom field in the Custom Field Manager page.
Click the Save button once you are done editing custom fields. The modal window closes.
Your custom fields are updated. They appear in the Custom Field Manager page.
To delete a custom field:
-
Follow the steps above to navigate to the Custom Field Manager.
-
Click the Custom Fields link in the Detail Section menu.
The Custom Fields page opens.
-
Select the custom field you want to delete.
-
Click the Delete Custom Fields button  .
.
A dialog box opens, asking you to confirm your choice.
-
Click the Save button.
The custom field is deleted. It no longer appears in the Custom Field Manager page.
Important!
Adding or updating a default layout does not impact existing workspace records—it is only referenced when creating new workspace records.
To create a default layout for the custom fields detail section:
-
Follow the steps above to navigate to the Custom Field Manager.
-
Click the Layout link in the Detail Section menu.
The Layout page opens.
-
Click the Configure Custom Fields button  .
.
The Configure Custom Fields modal window opens.
-
Select the custom fields you want to add to your layout from the Available Fields field.
Note:
To select multiple custom fields at once, press the CTRL button on your keyboard and then select the fields.
-
Click the Right Arrow button to move the custom fields to the Selected Fields field (or click the Left Arrow to move custom fields back to the Available Fields field).
-
To change the order the custom fields appear in the layout:
-
Select the custom field you want to reorder in the Selected Fields field.
-
Click the Up Arrow or Down Arrow buttons to change the order in which the selected fields appear.
-
To make a custom field required:
-
Select a custom field from the Selected Fields field.
-
Select the Required check box to make the custom field required.
-
Click the Save button.
The Configure Custom Fields modal window closes. The custom fields you chose appear in the layout.


