Documents - Upgraded User Interface
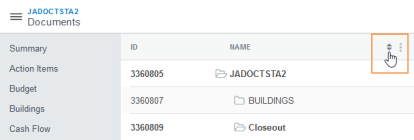
 Sort the Documents Detail Section
You can sort the documents in all Documents detail sections by:
-
Name – Alphabetic and reverse-alphabetic order
-
Created Date – Newest and Oldest Date
-
Modified Date – Newest and Oldest Date
-
Document Date – Newest and Oldest Date
-
ID – Smallest and Largest
-
Type – Alphabetic and reverse-alphabetic order
The sort order cascades from folders to documents within the folders. For example, sorting by a Name will sort all folders into alphabetic order, and then all documents within each folder in alphabetic order. The folder structure of the Documents detail section will remain the same.
To sort the Documents detail section:
 Add a Document
To add a document:
-
Select the Documents detail section in the Detail Section menu.
-
Select the folder in which you want the document to be stored.
-
Click the Add Document button
 in the toolbar on the right side of the window.
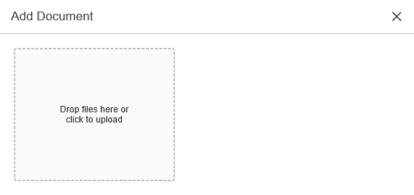
The Add Document window opens.
Add Document window.
-
Choose between two options:
-
Click the Drop files here or click to upload box.
An Upload dialog box opens. Select the document you want to upload. Click the Open button. The document automatically begins to upload.
Note:This option allows you to select multiple documents at once.
-
Drag and drop a document from your computer into the Drop files here or click to upload box.
The document automatically begins to upload.
-
-
Click the Close button in the upper-right corner of the Add Document window once the upload is complete.
The new document appears in the Documents detail section.
-
To change the name of the document:
-
Double-click the document name.
The document name becomes editable.
-
Enter the new name in the Name field.
-
Click the Save button.
-
 Add a Folder
To add a folder to the documents detail section:
-
Select the Documents detail section in the Detail Section menu.
-
If you want to create a sub-folder within another folder, click the folder you want as the parent folder.
-
Click the Add Folder button
 in the toolbar on the right side of the Details pane.
A new folder appears in the Documents detail section.
-
To change the name of the folder:
-
Double-click the folder name.
The folder name becomes editable.
-
Enter the new name in the Name field.
-
Click the Save button.
-
 Check Out/Check In a Document
You can check out a document to make changes to it, and check in the document again when the changes are complete. When a document is checked out, no users can make edits to the document until you have checked the document in again.
 Check Out a Document
To check out a document:
-
Select the Documents detail section in the Detail Section menu.
-
Select the document you want to check out.
-
Click the Check Out Document button
 in the toolbar on the right side of the window.
The document downloads, and your computer asks if you want to open or save the document.
 Check In a Document
To check in a document:
-
Select the Documents detail section in the Detail Section menu.
-
Select the document you want to check in.
-
Click the Check In Document button
 in the toolbar on the right side of the window.
The Check In window opens.
-
Click the Browse button.
An Upload dialog box opens. Select the file you want to upload. Click the Open button.
-
Click the Save button.
The Upload dialog box closes. Your document is checked in.
 Delete a Document or Folder
To delete a document or folder:
-
Select the Documents detail section in the Detail Section menu.
-
Select the document or folder you want to delete.
-
Click the Delete button
 in the toolbar on the right side of the window.
A dialog box opens, asking you to confirm your choice.
Note:If a document is associated with a record—for example, a tenant inducement in the Leases workspace—the system warns you that the document is linked to a record. If you proceed with the deletion, the document is un-linked from the record and then deleted.
-
Click the OK button.
The document or folder is deleted. It no longer appears in the Documents detail section.
 Email a Document
To email a document:
-
Select the Documents detail section in the Detail Section menu.
-
Select the document you want to email.
-
Click the Send Document button
 in the toolbar on the right side of the window.
The Send Document window opens.
-
Enter the recipient’s email address in the To type-ahead field.
-
Enter the email addresses of any recipients you want to carbon copy in the CC type-ahead field.
-
Enter a personalized subject line for the email in the Subject field.
-
Enter a message in the Message field.
-
Click the Send button.
The Send Document window closes. Your email is sent.
 Move a Document
-
Open the workspace where your document is stored.
-
Select the record where the document is saved.
-
Select the Documents detail section from the Detail Section menu.
-
Select the document you want to move.
-
Click the Move Document button
 in the toolbar on the right side of the Details pane.
The Move Document window opens.
Move Document window.
-
Select the folder where you want your document to be moved.
Note:To expand a folder and see its sub-folders, select the folder.
-
Click the Save button.
The window closes. The document is moved to the new folder.
 View Approval Information
To manage document approvals:
-
Select the Documents detail section in the Detail Section menu.
-
Select the document whose approvals you want to manage.
-
Click the View Approval Information button
 in the toolbar on the right side of the window.
The View Approval Information window opens.
-
Click the
 button to add an approver.
The Add Approvers page opens.
-
Follow the appropriate procedures on the Approvals procedures page
 Open a File
To open a file:
-
Select the Documents detail section in the Detail Section menu.
-
Select the file you want to open.
-
Click the Open File button
 in the toolbar on the right side of the Details pane.
The file opens in a separate tab.


