Resources Detail Section - Common Procedure
The Resources detail section allows you to manage the people who are assigned roles on your transaction, program, or project (members) and those who can be contacted about the transaction, program, or project (contacts).
To perform actions in this detail section, you need to be able to see the Details pane. Click the List View, Summary View, and Map View buttons  to toggle different content views. For more information about different content views, see the Content Views section of the Common Attributes of Workspaces page.
 Add Resource
To add a resource to a program, project, or transaction:
-
Select the Resources detail section from the Detail Section menu.
-
Click the Add Resource button
 in the toolbar on the right side of the Details pane.
The Add Resource window opens.
-
Choose between two options:
-
Select the Member tab if you want to add a person who has a direct role in the program, project, or transaction.
-
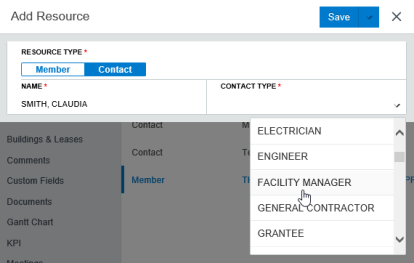
Select the Contact tab if you want to add a person who may need information about the program, project, or transaction, but is not directly involved in it - for example, an architect or a tenant on a lease.
-
-
If you selected the Member tab:
-
Enter the member's name in the Name field.
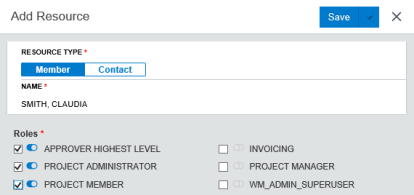
The Roles table appears. Roles that this member can be assigned to appear in the Roles table.
-
Select the check boxes to assign or un-assign roles to a member.
Note:The roles you assign to a member determine what abilities they have in relation to the program, project, or transaction.
Add Resource window with Member tab selected. The Roles table appears after a member has been selected.
-
Click the Toggle button next to a role to indicate whether a member is actively in that role (toggled blue) or no longer active (toggled gray).
This toggle functionality is used for record-keeping.
-
-
If you selected the Contact tab:
-
Choose between two options:
-
Click the Save button.
The Add Resource window closes. Your new resource appears in the Resources detail section.
-
Click the drop-down arrow next to the Save button and click Save & New from the menu that appears.
The resource is saved and cleared from view. Repeat steps 3 - 6 until all resources are entered.
-
 Edit Resource
To edit a resource:
-
Select the Resources detail section from the Detail Section menu.
-
Select the resource you want to edit.
-
Click the Edit Resource button
 in the toolbar on the right side of the Details pane.
The Edit Resource window opens.
-
If the resource you are editing is a member, select the check boxes next to the roles you want the member to have, and clear the check boxes next to the roles you do not want them to have.
-
If the resource you are working with is a contact, change the contact type.
-
Choose between two options:
-
Click the Save button.
The Edit Resource window closes. Your updated resource appears in the Resources detail section.
-
Click the drop-down arrow next to the Save button and click Save & Next from the menu that appears.
The resource is saved and cleared from view. Repeat steps 4 - 6 until you have finished updating your resources.
-
 Delete Resource
To delete a resource:
-
Select the Resources detail section from the Detail Section menu.
-
Select the resource you want to delete.
-
Click the Delete Resource button
 in the toolbar on the right side of the Details pane.
A dialog box opens, asking you to confirm your choice.
-
Click the OK button.
The resource is deleted. It no longer appears in the Resources detail section.


