Cash Flow Detail Section - Projects Workspace
The Cash Flow detail section is used to project when expenses on a project will be paid. This helps you track your budget and make adjustments to your spending.
Before you can use this detail section, you must first have an approved budget.
To perform actions in this detail section, you need to be able to see the Details pane. Click the List View, Summary View, and Map View buttons  to toggle different content views. For more information about different content views, see the Content Views section of the Common Attributes of Workspaces page.
 Create
Before a cash flow is created, this message appears in the detail section: Cash Flows have not been created yet.
To create a cash flow:
-
Open the Projects workspace.
-
Select the project you want to create a cash flow for.
Read the Filters page and the Collections section of the Common Attributes of Workspaces page to learn how to filter the records in your workspace.
-
Select the Cash Flow detail section from the Detail Section menu.
-
Click the Create Version button
 in the toolbar on the right side of the Details pane.
The Create Cash Flow Version window opens.
-
Enter the name of the cash flow in the Name field.
-
Click in the Start Date field and use the Date Picker to select the start date for the cash flow.
-
Enter the number of periods the cash flow applies to in the Number of Periods field.
-
Click the Save button.
The Create Cash Flow Version window closes, and the cash flow is created.
Note:When you create a cash flow, a field appears next to the Create Version button in the toolbar on the right side of the Details pane. When you create multiple cash flows, you can select which cash flow to view by selecting the appropriate cash flow from this field.
Note:If you cannot see any items in your cash flow, you may need to change the view you are using. See the Toggle View procedures below to learn how.
 Edit Forecast Version
You can also rename a cash flow by following the Rename Version procedures below.
To edit the details of a cash flow:
-
Open the Projects workspace.
-
Select the project whose cash flow you want to edit.
Read the Filters page and the Collections section of the Common Attributes of Workspaces page to learn how to filter the records in your workspace.
-
Select the Cash Flow detail section from the Detail Section menu.
-
Select the forecast version you want to edit from the field to the left of the Create Version button
 .
. -
Click the Edit Forecast Version button
 in the toolbar on the right side of the Details pane.
The Edit Cash Flow Version window opens.
-
Make your changes.
-
Click the Save button.
The Edit Cash Flow Version window closes, and the cash flow version is updated.
 Rename Version
You can also rename a cash flow by following the Edit Forecast Version procedures above.
To rename a cash flow version:
-
Open the Projects workspace.
-
Select the project whose cash flow you want to rename.
Read the Filters page and the Collections section of the Common Attributes of Workspaces page to learn how to filter the records in your workspace.
-
Select the Cash Flow detail section from the Detail Section menu.
-
Click the field to the left of the Create Version button
 in the toolbar on the right side of the Details pane.
 -
Click the Rename button next to the version you want to rename.
The version name becomes editable.
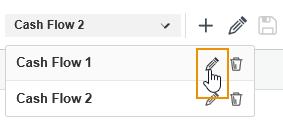
Rename button.
-
Enter the new name in the Name field.
-
Click the Save button.
The version name is changed.
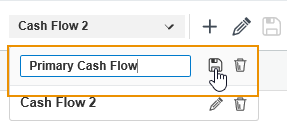
Save button.
 Delete Version
To delete a cash flow version:
-
Open the Projects workspace.
-
Select the project whose cash flow you want to delete.
Read the Filters page and the Collections section of the Common Attributes of Workspaces page to learn how to filter the records in your workspace.
-
Select the Cash Flow detail section from the Detail Section menu.
-
Click the field to the left of the Create Version button
 in the toolbar on the right side of the Details pane.
 -
Click the Delete button next to the version you want to delete.
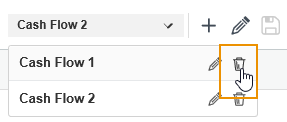
Delete button.
A dialog box opens, asking you to confirm your choice.
-
Click the OK button.
The cash flow is deleted.
 Enter Data into Cash Flow
To enter data into a cash flow:
-
Open the Projects workspace.
-
Select the project whose cash flow you want to edit.
Read the Filters page and the Collections section of the Common Attributes of Workspaces page to learn how to filter the records in your workspace.
-
Select the Cash Flow detail section from the Detail Section menu.
-
Select the version you want to work with from the field to the left of the Create Version button
 in the toolbar on the right side of the Details pane.
 -
Double-click on the fields you want to edit.
The fields become editable.
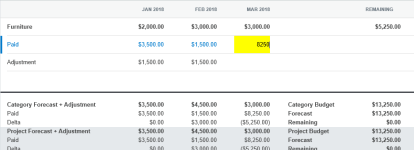
The cell turns yellow when you can edit its value.
-
Enter your data.
-
Click the Save button.
Your data is saved in the cash flow.
 Publish / Unpublish Cash Flow
Publishing a cash flow signals that the cash flow is expected to be correct.
The procedures for both publishing and unpublishing a cash flow are the same.
To publish or unpublish a cash flow:
-
Open the Projects workspace.
-
Select the project whose cash flow you want to publish or unpublish.
Read the Filters page and the Collections section of the Common Attributes of Workspaces page to learn how to filter the records in your workspace.
-
Select the Cash Flow detail section from the Detail Section menu.
-
Select the version you want to work with from the field to the left of the Create Version button
 in the toolbar on the right side of the Details pane.
 -
Click the Publish / Unpublish button
 in the toolbar on the right side of the Details pane.
The cash flow is either published or unpublished.
 Toggle View
The Toggle View action filters the data to show the portion of the cash flow data that is relevant to the selected category.
To view a different category:
-
Open the Projects workspace.
-
Select the project whose cash flow you want to view.
Read the Filters page and the Collections section of the Common Attributes of Workspaces page to learn how to filter the records in your workspace.
-
Select the Cash Flow detail section from the Detail Section menu.
-
Click the Toggle View button
 in the toolbar on the right side of the Details pane.
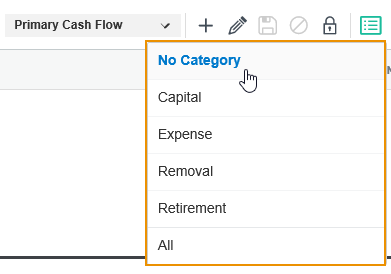
A field opens, displaying the view options. The currently selected option is bold and the text is blue.
Toggle view field. Since the user is currently viewing items with no category, No Category is bold and blue.
-
Select the view you want to use.
The pane refreshes, and the cash flow items matching the view you selected appear in the Details pane.
