Income & Expenses Detail Section - Equipment Lease Workspace
You can use the Income & Expenses detail section to enter all income and expenses associated with an equipment lease. You can choose to create invoices for an income or expense, and you can also associate the income or expense with a specific article or section of your lease documents.
To perform actions in this detail section, you need to be able to see the Details pane. Click the List View, Summary View, and Map View buttons  to toggle different content views. For more information about different content views, see the Content Views section of the Common Attributes of Workspaces page.
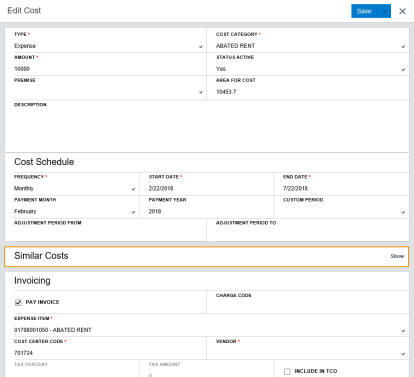
A Similar Costs data grid exists in the Create and Edit Costs windows. This data grid is collapsed when you first open the window. You must select a value in the Cost Category field for it to become active. Click Show to open the data grid.
Similar Costs data grid, collapsed.
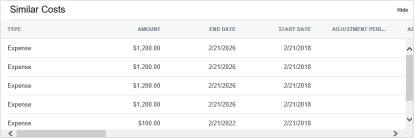
This data grid displays all costs that share the same Cost Category as the cost you are creating or editing. For example, in the screen shot below, the Similar Costs data grid displays all costs that share the Abated Rent Cost Category selected in the screen shot above.
Similar Costs Data grid, expanded.
 Add Income or Expense
If you selected No in the Pay Invoice field when creating your lease, the Invoicing table in the Create Cost window will be inactive.
To add an income or expense to a lease:
-
Open the Equipment Lease workspace.
-
Select the equipment lease to which you want to add an income or expense.
Read the Filters page and the Collections section of the Common Attributes of Workspaces page to learn how to filter the records in your workspace.
-
Select the Income & Expenses detail section from the Detail Section menu.
-
Click the Create Cost button
 in the toolbar on the right side of the Details pane.
The Create Cost window opens.
-
Select either Income or Expense from the Type field.
Income and Expenses are records that are associated to the lease. These records are either track money generated by the lease (Income) or money paid out on the lease (Expense).
-
Select the type of cost from the Cost Category field.
The Cost Category field allows you to define the income/expense record by values such as base rent, storage, or any other income/expense categories that you define.
-
Enter the amount in the Amount field.
-
Select Yes or No from the Status Active field to indicate whether this cost is active or inactive.
-
Enter a description in the Description field.
-
Select the frequency from the Frequency field under the Cost Schedule heading.
-
Click in the Start Date and End Date fields and use the Date Pickers to select the start date and end date.
-
Select the payment month from the Payment Month field.
Note:The Payment Month field is required to set an iteration if your payment frequency is greater than one month. For example, if your cost is billed semi-annually, the system will need to know the month that the iteration should be based upon. This field is also required when you are entering a one-time cost.
-
Enter the payment year in the Payment Year field.
Note:The Payment Year field is required for one-time costs.
-
If this payment occurs in a custom period, select Yes from the Custom Period field. If not, select No.
-
Click in the Adjustment Period From and Adjustment Period To fields and use the Date Pickers to select the begin and end dates for your adjustment period.
-
Select the Pay Invoice check box if you want to pay invoices on this cost (or clear the check box if you do not).
Important!If the Pay Invoice check box is not selected, invoices cannot be generated from the cost.
-
If you have a charge code, enter it in the Charge Code field.
-
Enter the expense item in the Expense Item type-ahead field.
The Expense Item field allows you to categorize the type of cost the item falls under on an invoice.
-
Enter the cost center code in the Cost Center Code type-ahead field.
The cost centers will be limited to those within the AP system selected on the lease.
-
Select the vendor from the Vendor field.
Note:The available vendors in this list can be controlled with an Object Attribute: * COST_FORM.ASP - RESTRICT_VENDORS – [ SHOWALLVENDORCONTACTS | SHOWALLVENDORS | SHOWONLYPAYEE | SHOWONLYPAYOR ]
-
Enter the tax rate into the Tax Percent field.
The Tax Percent field is only enabled if the Tax Elected flag on the lease is set to Yes.
-
Enter the tax amount into the Tax Amount field.
The value in this field is automatically calculated based upon the Amount and Tax Percent. The Tax Amount field is only enabled if the Tax Elected flag on the lease is set to Yes.
-
Select the Include in TCO check box if you would like to indicate that this cost should be included in the total cost of ownership calculation.
This check box is a flag—it does not have any associated functionality.
-
Select the relevant document from the Document field.
Note:Click the Open button next to the Document field to open the document.
Note:If you enter a page number or the article/section that this cost pertains to, the document will open to that location when you open the document.
-
Enter the page number in which this cost is referred to in the Page Number field.
-
Enter the article/section in which this cost is referred to in the Article/Section field.
-
Choose between three options:
-
Click the Save button.
The Create Cost window closes. Your new cost appears in the Income & Expenses detail section.
-
Click the drop-down arrow next to the Save button and click Save & New from the menu that appears.
The cost is saved and cleared from view. Repeat steps 5-27 until all costs are entered.
-
Click the drop-down arrow next to the Save button and click Save & Similar from the menu that appears.
The cost is saved, and the comments on the cost are cleared from view. This allows you to create a similar cost. Repeat steps 5-27 until all costs are entered.
-
 Edit Income or Expense
If you make changes to an income or expense entry after a financial reporting accounting entry has been approved, a message will appear at the top of each detail section which reads: Changes have been made to this Lease which may require a remeasurement of one or more accounting entries. This message will remain until the relevant accounting entries are re-measured. To learn how to re-measure an accounting entry, see the Accounting Entries detail section page.
To edit an income or expense on an equipment lease:
-
Open the Equipment Lease workspace.
-
Select the equipment lease whose cost you want to edit.
Read the Filters page and the Collections section of the Common Attributes of Workspaces page to learn how to filter the records in your workspace.
-
Select the Income & Expenses detail section from the Detail Section menu.
-
Select the cost you want to edit.
-
Click the Edit Cost button
 in the toolbar on the right side of the Details pane.
The Edit Cost window opens.
-
Make your changes.
-
Choose between two options:
-
Click the Save button.
The Edit Cost window closes. Your updated income or expense appears in the Income & Expenses detail section.
-
Click the drop-down arrow next to the Save button and click Save & Next from the menu that appears.
The cost is saved and cleared from view. Repeat steps 6-7 until all costs are updated.
-
 View Income or Expense
To view an income or expense on a lease:
-
Open the Equipment Lease workspace.
-
Select the equipment lease whose income or expense you want to view.
Read the Filters page and the Collections section of the Common Attributes of Workspaces page to learn how to filter the records in your workspace.
-
Select the Income & Expenses detail section from the Detail Section menu.
-
Select the income or expense you want to view.
-
Click the View Cost button
 in the toolbar on the right side of the Details pane.
The View Cost window opens in read-only format.
-
Click the Close button
 once you are done viewing the income or expense.
 Clone Income or Expense
To clone an income or expense on an equipment lease:
-
Open the Equipment Lease workspace.
-
Select the equipment lease whose income or expense you want to clone.
Read the Filters page and the Collections section of the Common Attributes of Workspaces page to learn how to filter the records in your workspace.
-
Select the Income & Expenses detail section from the Detail Section menu.
-
Select the cost you want to clone.
-
Click the Clone Cost button
 in the toolbar on the right side of the Details pane.
The Clone Cost window opens.
-
Make any changes you want to the cloned item.
-
Choose between three options:
-
Click the Save button.
The Clone Cost window closes. Your cloned cost appears in the Income & Expenses detail section.
-
Click the drop-down arrow next to the Save button and click Save & New from the menu that appears.
The cost is saved and cleared from view. Repeat steps 6-7 until all cloned costs are entered.
-
Click the drop-down arrow next to the Save button and click Save & Similar from the menu that appears.
The cost is saved, and the comments on the cost are cleared from view. This allows you to clone the cost again with the same description, but different comments. Repeat steps 6-7 until all cloned costs are entered.
-
 Delete Income or Expense
To delete income or expenses from an equipment lease:
-
Open the Equipment Lease workspace.
-
Select the equipment lease whose income or expense you want to delete.
Read the Filters page and the Collections section of the Common Attributes of Workspaces page to learn how to filter the records in your workspace.
-
Select the Income & Expenses detail section from the Detail Section menu.
-
Select the income or expense you want to delete.
-
Click the Delete button
 in the toolbar on the right side of the Details pane.
A dialog box opens, asking you to confirm your choice.
-
Click the OK button.
The income or expense is deleted. It no longer appears in the Income & Expenses detail section.
 Toggle View
You can choose to view all income and expenses on an equipment lease, those that are current, and all of the income and expenses for the current year.
To toggle a different view:
-
Open the Equipment Lease workspace.
-
Select the equipment lease whose income and expenses you want to view.
Read the Filters page and the Collections section of the Common Attributes of Workspaces page to learn how to filter the records in your workspace.
-
Select the Income & Expenses detail section from the Detail Section menu.
-
Click the Toggle View button
 in the toolbar on the right side of the Details pane.
A field opens, displaying the view options. The currently selected option is bold and the text is blue.
Your options are:
-
All – When selected, all costs will display.
-
Current – When selected, any cost that is valid as of the current date displays.
-
Current Year – When selected, any cost that is valid between 01/01 and 12/31 of the current calendar year displays.
-
Custom – When selected, a dialog box will open. You will be required to select either a Start Date or an End Date, or both.
-
-
Select the view you want to use.
The pane refreshes, and the costs matching the view you selected appear in the Details pane.
 View Cost Detail (Manage Cost Schedules and Manage Cost Allocations)
To manage cost schedules and allocations:
-
Open the Equipment Lease workspace.
-
Select the equipment lease whose income or expense cost details you want to manage.
Read the Filters page and the Collections section of the Common Attributes of Workspaces page to learn how to filter the records in your workspace.
-
Select the Income & Expenses detail section from the Detail Section menu.
-
Select the income or expense whose cost details you want to manage.
-
Click the View Cost Detail button
 in the toolbar on the right side of the Details pane.
The Cost Details window opens.
-
Read the below expanding sections to learn more about the actions you can take in the Cost Details window:
 Edit Cost Schedule Line Item
To edit a cost schedule line item:
-
Follow the View Cost Detail procedures above.
-
Select the Manage Cost Schedule detail section from the Detail Section menu.
-
Select the line item you want to edit.
-
Click the Edit button
 in the toolbar at the upper-right corner of the Cost Details window.
The Edit page opens.
-
Make your changes.
-
Click the Save button.
The Edit page closes. The updated cost schedule line item appears in the Cost Details window.
 Manage Cost Schedule View
Users can choose to either look at all items in their cost schedule at once, or they can look specifically at the costs which have been modified. In the case of an audit, this action would allow users to quickly review any changes made to the cost schedule of a lease.
Note:This action does not become available unless changes have been made to a line item in the Manage Cost Schedule detail section.
To toggle a different view for the Manage Cost Schedule detail section:
-
Follow the View Cost Detail procedures above.
-
Select the Manage Cost Schedule detail section from the Detail Section menu.
-
Click the Manage View button
 in the toolbar at the upper-right corner of the Cost Details window.
A field opens.

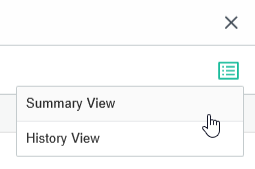
Manage View field.
-
Select either Summary View or History View.
-
Summary View - shows all costs in the cost schedule.
-
History View - shows all costs which have been modified, their modifications, when they were modified, and who modified them.
-
 Add Cost Allocation
To add a cost allocation:
-
Follow the View Cost Detail procedures above.
-
Select the Manage Cost Allocations detail section from the Detail Section menu.
-
Click the Add Allocation button
 in the toolbar at the upper-right corner of the Cost Details window.
A new line item appears in the Cost Details window.
-
Double-click the fields in the new line item to make changes.
-
Click the Save button.
The new cost allocation is saved. It appears in the Cost Details window.
 Delete Cost Allocation
Important!
Delete Cost Allocation
Important!The system will not warn you before you delete a cost allocation. Be sure you are certain you want to delete the cost allocation before you click the Delete button.
To delete a cost allocation:
-
Follow the View Cost Detail procedures above.
-
Select the Manage Cost Allocations detail section from the Detail Section menu.
-
Select the cost allocation you want to delete.
-
Click the Remove Allocation button
 in the toolbar at the upper-right corner of the Cost Details window.
The allocation is deleted.
 Clear All Cost Allocations
To clear all cost allocations:
-
Follow the View Cost Detail procedures above.
-
Select the Manage Cost Allocation detail section from the Detail Section menu.
-
Click the Clear All button
 in the toolbar on the right side of the Details pane.
The cost allocations are cleared from the screen.
-
Click the Save button.
Your changes are saved.
 Reset Default Cost Allocations
To reset default cost allocations:
-
Follow the View Cost Detail procedures above.
-
Select the Manage Cost Allocation detail section from the Detail Section menu.
-
Click the Reset Default button
 in the toolbar on the right side of the Details pane.
The default cost allocations are restored.
-
Click the Save button.
Your changes are saved.
 Toggle Cost Allocation Views
To toggle a different allocation view:
-
Follow the View Cost Detail procedures above.
-
Select the Manage Cost Allocation detail section from the Detail Section menu.
-
Click the Toggle View button
 in the toolbar on the right side of the Details pane.
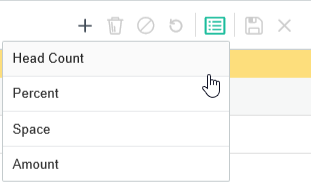
A field opens, displaying the view options.

Toggle view field.
-
Select the view you want to use.
The pane refreshes, and the allocations matching the view you selected appear in the Manage Cost Allocation detail section.
-
 Preview Document
If an income or expense is associated with a document (see the Add Income or Expense procedures, steps 24 - 26), you can preview the part of the document that the income or expense is associated with.
To preview the document:
-
Open the Equipment Lease workspace.
-
Select the lease whose income or expense document you want to preview.
Read the Filters page and the Collections section of the Common Attributes of Workspaces page to learn how to filter the records in your workspace.
-
Select the Income & Expenses detail section from the Detail Section menu.
-
Select the income or expense whose document you want to preview.
-
Click the Preview button
 in the toolbar on the right side of the Details pane.
The document opens in a new tab.
 Configure the Details Pane
See the Customize What You See procedures to learn how to configure the Details pane.


