Allocation Items DS - Purchase Orders Workspace
The Allocation Items detail section allows you to enter the cost center allocations for your purchase order. If you need to split the cost of a purchase order over multiple cost centers, you can add multiple allocation items.
You are required to enter at least one allocation item prior to closing a purchase order. You are also required to enter at least one line item, and receive approval.
To perform actions in this detail section, you need to be able to see the Details pane. Click the List View, Summary View, and Map View buttons  to toggle different content views. For more information about different content views, see the Content Views section of the Common Attributes of Workspaces page.
 Add Allocation
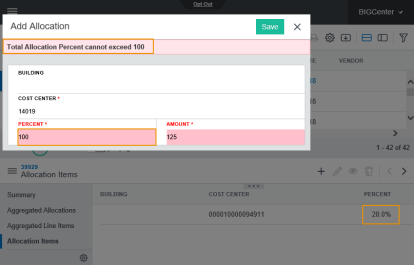
If you need to split the cost of a purchase order over multiple cost centers, you can add multiple allocation items to the Allocation Items detail section.
You cannot add allocation items which total more than 100%.
The system prevents you from exceeding 100% in allocations.
To add an allocation item:
-
Open the Purchase Orders workspace.
-
Select the purchase order to which you want to add an allocation item.
Read the Filters page and the Collections section of the Common Attributes of Workspaces page to learn how to filter the records in your workspace.
-
Select the Allocation Items detail section from the Detail Section menu.
-
Click the Add Allocation button
 in the toolbar on the right side of the Details pane.
The Add Allocation window opens.
-
Enter the building in the Building type-ahead field.
-
Enter the cost center in the Cost Center type-ahead field.
-
Choose between two options:
-
In the Percent field, enter the percentage which should be allocated to the cost center specified in Step 6, or
-
In the Amount field, enter the amount which should be allocated to the cost center specified in Step 6.
Note:A value in one field will cause a value in the other field to automatically calculate.
-
-
Click the Save button.
The Add Allocation window closes. The allocation item is added to the Allocation Items detail section.
 Edit Allocation
To edit an allocation item:
-
Open the Purchase Orders workspace.
-
Select the purchase order whose allocation item you want to edit.
Read the Filters page and the Collections section of the Common Attributes of Workspaces page to learn how to filter the records in your workspace.
-
Select the Allocation Items detail section from the Detail Section menu.
-
Select the allocation item you want to edit.
-
Click the Edit Allocation button
 in the toolbar on the right side of the Details pane.
The Edit Allocation window opens.
-
Make your changes.
-
Click the Save button.
The Edit Allocation window closes. The allocation item is updated.
 View Allocation
To view an allocation item:
-
Open the Purchase Orders workspace.
-
Select the purchase order whose allocation item you want to view.
Read the Filters page and the Collections section of the Common Attributes of Workspaces page to learn how to filter the records in your workspace.
-
Select the Allocation Items detail section from the Detail Section menu.
-
Select the allocation item you want to view.
-
Click the View Allocation button
 in the toolbar on the right side of the Details pane.
The allocation item appears in read-only mode.
-
Click the Close button
 to exit once you are done viewing the allocation item.
 Delete Allocation
To delete an allocation:
-
Open the Purchase Orders workspace.
-
Select the purchase order whose allocation you want to delete.
Read the Filters page and the Collections section of the Common Attributes of Workspaces page to learn how to filter the records in your workspace.
-
Select the Allocation Items detail section from the Detail Section menu.
-
Select the allocation you want to delete.
-
Click the Delete Allocation button
 in the toolbar on the right side of the Details pane.
A dialog box opens, asking you to confirm your choice.
-
Click the OK button.
The allocation item is deleted. It no longer appears in the Allocation Items detail section.

