Lease Invoice Workspace
The Lease Invoice workspace is used to manage and create invoices associated with leases in the Leases workspace and the Equipment Lease workspace.
 Create Non-Recurring Invoice
To create a non-recurring invoice:
-
Open the Lease Invoice workspace.
-
Click the Create Non-Recurring Invoice button
 in the toolbar on the right side of the Collections pane.
The Create New Lease Invoice page opens.
-
Enter the invoice number in the Invoice Number field.
-
Enter the lease in the Lease type-ahead field.
-
Enter the invoice amount in the Invoice Amount field.
-
Click in the Invoice Date field and use the Date Picker to select the invoice date.
Note:The Invoice Period Month and Invoice Period Year fields will automatically populate based upon the value in the Invoice Date field.
-
Select the invoice type from the Type field.
The available options in the Type field depend upon if the selected lease is income or expense. If the lease is an expense lease, the types are either Accounts Payable or Journal Event A/P. If the lease is an income lease, the types are Accounts Receivable or Journal Event A/R.
-
Select the vendor from the Vendor field.
-
If you would like to use the default allocations for the lease, leave the Apply Default Allocations check box selected. If not, clear the check box.
-
Click the Save button.
You are returned to the Lease Invoice workspace. The invoice you created appears as selected.
 Print a Lease Invoice
-
Open the Lease Invoice workspace.
-
Click the Toggle Multi-Select Mode button
 in the toolbar on the right side of the Collections pane.
Check boxes now appear next to the left-most column in the Collections pane.
-
Select the check box next to the invoice you want to print.
Note:To print multiple lease invoices at once, select the check boxes of all invoices you want to print.
-
Click the Print button
 in the toolbar on the right side of the Collections pane.
A print preview page opens in another tab.
-
Print your invoice.
 Send for Approval
Sending an invoice for approval will send it to an administrator with the appropriate approval permissions. The approver will see the invoice appear in the My Approvals pane of the legacy Home page.
You can view the details of an invoice from the Eligible Invoices and Ineligible Invoices detail sections by selecting the invoice and clicking the View Invoice button ![]() . The invoice will open in a new window.
. The invoice will open in a new window.
To send invoices for approval:
-
Open the Lease Invoice workspace.
-
Choose between three options:
-
To send a single invoice for approval, select the invoice and click Send for Approval
 directly from the Summary detail section.
 -
To send all open invoices for approval, proceed to step 3.
-
To select particular invoices for approval:
-
Click the Toggle Multi-Select Mode button
 in the toolbar on the right side of the Collections pane.
Check boxes appear to the left of the left-most column of the Collections pane. -
Select the check boxes next to the invoices you want to send for approval.
-
-
-
Click the Send for Approval button
 in the toolbar on the right side of the Collections pane.
The Send for Approval window opens. The Summary detail section is open by default. -
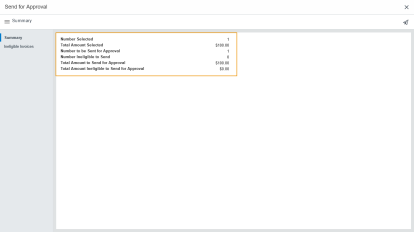
Review the information in the Summary detail section and the Ineligible for Invoice detail section of the Send for Approval window to ensure that the information is correct.
In the screen shot below, the total number of invoices selected is listed in the first line, Number Selected. Additional information about the invoices is also listed. The invoices which are ineligible to be invoiced appear in the Number Ineligible to Send line.
You can view more information about the ineligible invoices in the Ineligible For Invoice detail section. Additionally, if you open the Ineligible Invoices detail section and scroll to the right, two columns appear which may help you understand why you cannot approve the invoice.
-
Click the Send for Approval button
 in the toolbar on the upper-right side of the Summary detail section of the Send for Approval window.
A dialog box opens, asking you to confirm your choice.
-
Click the OK button.
The dialog box closes. The invoices are sent for approval. The approval requests will be sent to the approver with the appropriate approval permissions and threshold.
 Approve, Reject, or Void Invoices
There are three actions that can be taken on an invoice—Approve, Reject, or Void. They all follow the same workflow.
You can view the details of an invoice from the Eligible Invoices and Ineligible Invoices detail sections by selecting the invoice and clicking the View Invoice button ![]() . The invoice will open in a new window.
. The invoice will open in a new window.
To take action on an invoice:
-
Open the Lease Invoice workspace.
-
Choose between two options:
-
If you want to take action on all invoices with a status of Pending Approval, proceed to step 3.
-
If you want to take action on particular invoices:
-
Click the Toggle Multi-Select Mode button
 in the toolbar on the right side of the Collections pane.
Check boxes appear to the left of the left-most column of the Collections pane.
-
Select the check boxes next to the invoices you want to change status.
If you want to see all invoices with a status of Pending Approval:
-
Click the Filter button
 in the toolbar on the right side of the Collections pane.
The Filter Panel opens.
-
Select Pending Approval from the Status field.
-
Click the Check Mark icon at the top of the Filter Panel to apply your filter.

Check mark icon.
The filter is applied. All invoices with a status of Pending Approval appear in the Collections pane.
-
-
-
-
Click the Approve Invoices button
 in the toolbar on the right side of the Collections pane.
The Approve Invoices window opens.
-
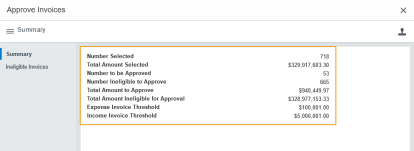
Verify that the information in the Summary detail section of the Approve Invoices window is correct.
The Summary detail section displays the number of invoices selected, the total amount of those invoices, and information about invoices that cannot be approved. Your Expense Invoice Threshold and Income Invoice Threshold also appear. These fields display your approval limits for expense and income invoices.
Note:If there are invoices which are not eligible for approval, you can view them in the Ineligible Invoices detail section. Additionally, if you open the Ineligible Invoices detail section and scroll to the right, two columns appear which may help you understand why you cannot approve the invoice.
-
The second-to-last column is the Amount Total Invoice column, which displays the total amount of the invoice.
-
The last column is the Ineligible Reason column, which displays the reason an invoice is ineligible for approval.
Approve Invoices window.
-
-
Choose between three options:
-
To approve the invoices:
-
Click the Approve Invoices button
 in the toolbar in the upper-right corner of the Approve Invoices window.
A dialog box opens, asking you to confirm your choice.
-
Click the OK button.
The window closes. The invoice status changes to Approved.
-
-
To reject the invoices:
-
Click the Reject Invoices button
 in the toolbar in the upper-right corner of the Approve Invoices window.
A dialog box opens, asking you to confirm your choice.
-
Click the OK button.
The window closes. The invoice status changes to Open.
-
-
To void the invoices:
-
Click the Void Invoices button
 in the toolbar in the upper-right corner of the Approve Invoices window.
A dialog box opens, asking you to confirm your choice.
-
Click the OK button.
The window closes. The invoice status changes to Void.
-
-
 Send for Payment
Send for Payment will send your invoices from BIGCenter to your accounting system.
You can view the details of an invoice from the Eligible Invoices detail section by selecting the invoice and clicking the View Invoice button ![]() . The invoice will open in a new window.
. The invoice will open in a new window.
You can only send an invoice for payment if:
-
You have the Export Invoice setting on your lease set to Yes, and
-
The invoice is approved.
To send invoices for payment:
-
Open the Lease Invoice workspace.
-
Choose between two options:
-
If you want to send all invoices for payment, proceed to step 3.
-
If you want to send particular invoices for payment:
-
Click the Toggle Multi-Select Mode
 button in the toolbar on the right side of the Collections pane.
Check boxes appear to the left of the left-most column of the Collections pane.
-
Select the check boxes next to the invoices you want to send for payment.
-
-
-
Click the Send for Payment
 button in the toolbar on the right side of the Collections pane.
The Send for Payment window opens. The Summary detail section is open by default. -
Review the information in the Summary and Eligible Invoices detail sections.
To review the selected invoices:
-
Select the Eligible Invoices detail section in the Detail Section menu.
The Eligible Invoices detail section of the Send for Payment window opens. The invoices that will be sent for payment are listed. -
Review the selected invoices.
-
Clear the check box next to any invoice you do not want to send.
-
Select the Summary detail section in the Detail Section menu.
The Summary detail section opens.
-
-
Click the Send for Payment
 button in the toolbar on the upper-right corner of the Send for Payment window.
 -
Click the OK button.
The dialog box closes. Your custom configured send for payment window opens.
-
Follow the procedures provided by your administrator for sending your invoices for payment in your accounting system.
The invoices are sent for payment and their status is updated to PAYMENT PENDING or PAID, depending on your settings.
 Configure the Collections Pane
See the Customize What You See procedures to learn how to configure the Collections pane.
 Export Collections Records to a .CSV File
See the Export Collections procedures to learn how to export the records in the currently selected collection to a .csv file.


