Summary Detail Section - Lease Invoice Workspace
The Summary detail section gives you a high-level view of your lease invoice, and allows you to make changes to the invoice as needed.
To perform actions in this detail section, you need to be able to see the Details pane. Click the List View, Summary View, and Map View buttons  to toggle different content views. For more information about different content views, see the Content Views section of the Common Attributes of Workspaces page.
 Edit a Lease Invoice
To edit a lease invoice:
-
Open the Lease Invoice workspace.
-
Select the lease invoice you want to edit.
Read the Filters page and the Collections section of the Common Attributes of Workspaces page to learn how to filter the records in your workspace.
-
Select the Summary detail section from the Detail Section menu.
-
Click the Edit button
 in the toolbar on the right side of the Details pane.
The Summary detail section expands to full-screen and becomes editable.
-
Make your changes.
-
Click the Save button.
The Summary detail section collapses. Your changes are saved.
 Send for Approval
Sending an invoice for approval will send it to an administrator with the appropriate approval permissions. The approver will see the invoice appear in the My Approvals pane of the legacy Home page.
You can view the details of an invoice from the Eligible Invoices and Ineligible Invoices detail sections by selecting the invoice and clicking the View Invoice button ![]() . The invoice will open in a new window.
. The invoice will open in a new window.
To send invoices for approval:
-
Open the Lease Invoice workspace.
-
Select the lease invoice you want to send for approval.
-
Select the Summary detail section from the Detail Section menu.
-
Click the Send for Approval
 button in the toolbar on the right side of the Details pane.
 -
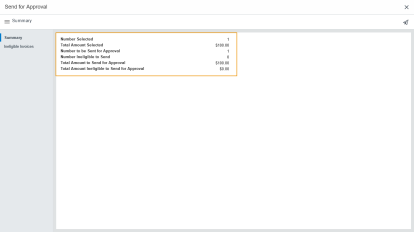
Review the information in the Summary detail section and the Ineligible for Invoice detail section of the Send for Approval window to ensure that the information is correct.
In the screen shot below, the total number of invoices selected is listed in the first line, Number Selected. Additional information about the invoices is also listed. The invoices which are ineligible to be invoiced appear in the Number Ineligible to Send line.
You can view more information about the ineligible invoices in the Ineligible For Invoice detail section. Additionally, if you open the Ineligible Invoices detail section and scroll to the right, two columns appear which may help you understand why you cannot approve the invoice.
-
Click the Send for Approval button
 in the toolbar on the upper-right side of the Summary detail section of the Send for Approval window.
A dialog box opens, asking you to confirm your choice.
-
Click the OK button.
The dialog box closes. The invoice is sent for approval. The approval request will be sent to the approver with the appropriate approval permissions and threshold.
 Approve Invoice
There are three actions that can be taken on an invoice—Approve, Reject, or Void. They all follow the same workflow.
You can view the details of an invoice from the Eligible Invoices and Ineligible Invoices detail sections by selecting the invoice and clicking the View Invoice button ![]() . The invoice will open in a new window.
. The invoice will open in a new window.
To take action on an invoice:
-
Open the Lease Invoice workspace.
-
Select the lease invoice you want to approve, reject, or void.
-
Select the Summary detail section from the Detail Section menu.
-
Click the Approve Invoice button
 in the toolbar on the right side of the Details pane.
The Approve Invoices window opens.
-
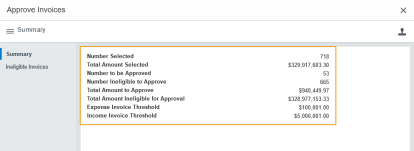
Verify that the information in the Summary detail section of the Approve Invoices window is correct.
The Summary detail section displays the number of invoices selected, the total amount of those invoices, and information about invoices that cannot be approved. Your Expense Invoice Threshold and Income Invoice Threshold also appear. These fields display your approval limits for expense and income invoices.
Note:If there are invoices which are not eligible for approval, you can view them in the Ineligible Invoices detail section. Additionally, if you open the Ineligible Invoices detail section and scroll to the right, two columns appear which may help you understand why you cannot approve the invoice.
-
The second-to-last column is the Amount Total Invoice column, which displays the total amount of the invoice.
-
The last column is the Ineligible Reason column, which displays the reason an invoice is ineligible for approval.
-
-
Choose between three options:
-
To approve the invoice:
-
Click the Approve Invoices button
 in the toolbar in the upper-right corner of the Approve Invoices window.
A dialog box opens, asking you to confirm your choice.
-
Click the OK button.
The window closes. The invoice status changes to Approved.
-
-
To reject the invoice:
-
Click the Reject Invoices button
 in the toolbar in the upper-right corner of the Approve Invoices window.
A dialog box opens, asking you to confirm your choice.
-
Click the OK button.
The window closes. The invoice status changes to Open.
-
-
To void the invoice:
-
Click the Void Invoices button
 in the toolbar in the upper-right corner of the Approve Invoices window.
A dialog box opens, asking you to confirm your choice.
-
Click the OK button.
The window closes. The invoice status changes to Void.
-
-
 Delete Invoice
To delete an invoice:
-
Open the Lease Invoice workspace.
-
Select the invoice you want to delete.
Read the Filters page and the Collections section of the Common Attributes of Workspaces page to learn how to filter the records in your workspace.
-
Select the Summary detail section from the Detail Section menu.
-
Click the Delete button
 in the toolbar on the right side of the Details pane.
A dialog box opens, asking you to confirm your choice.
-
Click the OK button.
The invoice is deleted.
 Reverse Invoice
This object attribute is not enabled by default. To enable this feature, contact Accruent support and ask them to enable the LEASE/SHOW_LEASE_INVOICE_REVERSALS object attribute.
-
Open the Lease Invoice workspace.
-
Select the invoice you want to reverse.
Read the Filters page and the Collections section of the Common Attributes of Workspaces page to learn how to filter the records in your workspace.
-
Select the Summary detail section from the Detail Section menu.
-
Click the Reverse Invoice button
 in the toolbar on the right side of the Details pane.
The invoice is reversed.


