Request for Proposal Detail Section - Projects Workspace
A Request for Proposal (RFP) is a document requesting proposals from prospective sellers of products and services (Project Management Institute, 558).The Request for Proposal detail section of the Projects workspace allows users to enter and track proposals submitted by vendors.You can then select the winning vendor from the pool of applicants, adjust your budget, and create purchase orders.
Project Management Institute, Inc.A Guide to the Project Management Body of Knowledge (PMBOK GUIDE).Fifth edition.Newtown Square, Pennsylvania: Project Management Institute, Inc., 2013.
Here is a hypothetical workflow for the Request for Proposal detail section:
-
The user enters line items into his or her budget.
-
The user selects an RFP Grouping for the line items he or she wants to request proposals for.
-
The user creates a request for proposal.
-
The user emails the request for proposal to prospective vendors.
-
Vendors submit their proposals.
-
The user selects the winning proposal.
-
The user adjusts his or her budget to accommodate the cost of the proposal.
-
The user creates purchase orders.
In order to perform actions in this detail section, you must first have a budget with line items associated to an RFP group.
To perform actions in this detail section, you need to be able to see the Details pane. Click the List View, Summary View, and Map View buttons  to toggle different content views. For more information about different content views, see the Content Views section of the Common Attributes of Workspaces page.
 Add Vendor
To add a vendor to an RFP:
-
Open the Projects workspace.
-
Select the project whose RFP you want to add vendors to.
Read the Filters page and the Collections section of the Common Attributes of Workspaces page to learn how to filter the records in your workspace.
-
Select the Request for Proposal detail section from the Detail Section menu.
-
Select the RFP you want to add vendors to from the field to the left of the Add Vendor button
 .
. -
Click the Add Vendor button
 in the toolbar on the right side of the Details pane.
The Add Vendor window opens.
-
Enter the vendor in the Vendor type-ahead field.
-
Choose between two options:
-
Click the Save button.
The Add Vendor window closes.The vendor appears in the Request for Proposal detail section.
-
Click the drop-down arrow next to the Save button and click Save & New from the menu that appears.
The vendor is saved and cleared from view.Repeat steps 6 - 7 until all vendors are entered.
-
-
Click the Close button
 to close the Add Vendor window.
 -
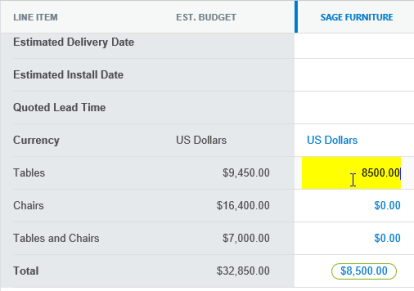
Double-click the fields you want to change in the Request for Proposal detail section.
The fields turn yellow when you can edit them.
-
Enter the proposal values into the fields.
-
Click the Save button.
The values you entered are saved.
 Edit Vendor
To change the vendor assigned to a RFP:
-
Open the Projects workspace.
-
Select the project whose RFP vendors you want to change.
Read the Filters page and the Collections section of the Common Attributes of Workspaces page to learn how to filter the records in your workspace.
-
Select the Request for Proposal detail section from the Detail Section menu.
-
Select the RFP whose vendor you want to change from the field to the left of the Add Vendor button
 .
. -
Select the vendor you want to change.
-
Click the Edit Vendor button
 in the toolbar on the right side of the Details pane.
The Edit Vendor window opens.
-
Enter the new vendor in the Vendor type-ahead field.
-
Click the Save button.
The Edit Vendor window closes.The updated vendor appears in the Request for Proposal detail section.
 Remove Vendor
To remove a vendor assigned to a RFP:
-
Open the Projects workspace.
-
Select the project whose RFP vendor you want to remove.
Read the Filters page and the Collections section of the Common Attributes of Workspaces page to learn how to filter the records in your workspace.
-
Select the Request for Proposal detail section from the Detail Section menu.
-
Select the RFP whose vendor you want to remove from the field to the left of the Add Vendor button
 .
. -
Select the vendor you want to remove.
-
Click the Remove Vendor button
 in the toolbar on the right side of the Details pane.
A dialog box opens, asking you to confirm your choice.
-
Click the OK button.
The vendor is removed from the RFP.
 Email RFP
To email an RFP:
-
Open the Projects workspace.
-
Select the project whose RFP you want to email.
Read the Filters page and the Collections section of the Common Attributes of Workspaces page to learn how to filter the records in your workspace.
-
Select the Request for Proposal detail section from the Detail Section menu.
-
Select the RFP you want to email from the field to the left of the Add Vendor button
 .
. -
Select the vendor you want to email from vendors added to the Request for Proposals detail section.
-
Click the Email RFP button
 in the toolbar on the right side of the Details pane.
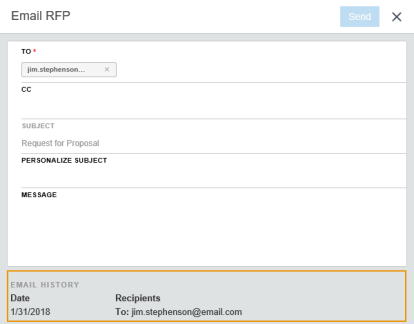
The Email RFP window opens.
-
Enter the vendor's email in the To type-ahead field.
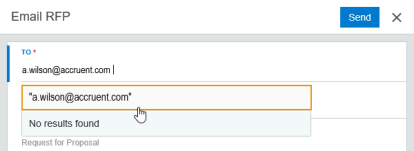
Note:The vendor's email should pre-populate in the To field.If the email does not pre-populate, it means that the vendor's profile does not have an associated email address.Type the email address in the To field, and then select it from the field that appears.
Select the email address from the field.
-
Enter the email of any recipients you want you carbon copy in the CC type-ahead field.
-
Enter a custom subject line for the email in the Personalize Subject field.
-
Enter a custom message in the Message field.
-
Click the Send button.
The email is sent.The Email RFP window closes.
 Create Purchase Order
To create a purchase order based upon an RFP:
-
Open the Projects workspace.
-
Select the project for which you want to create a purchase order.
Read the Filters page and the Collections section of the Common Attributes of Workspaces page to learn how to filter the records in your workspace.
-
Select the Request for Proposal detail section from the Detail Section menu.
-
Select the RFP you want to create a purchase order for from the field to the left of the Add Vendor button
 .
. -
Click the Create Purchase Order button
 in the toolbar on the right side of the Details pane.
The Create New Purchase Order page opens in a new tab.The purchase order will be pre-populated with data from your project and RFP.
-
Select the country taxing the purchase order from the Country field.
-
Enter a description in the Description field.
-
Select the currency that the purchase order was placed in from the Currency field.
-
Click in the Currency Date field and use the date picker to select the date whose currency conversion date you are using for the purchase order.
-
Enter the name of the building the purchase order should be shipped to in the Building Name type-ahead field of the Ship To section.
The address information populates with the information currently in the system for that building name.If the information has changed, make the necessary changes.
-
If the billing address will be the same as the shipping address, select the Same As Ship To check box in the Bill To section.If not, proceed to step 12.
The Bill To section will populate with the same data as shown in the Ship To section.
-
If the billing address will be different than the shipping address, enter the name of the building the purchase order should be billed to in the Building Name type-ahead field of the Bill To section.
The address information populates with the information currently in the system for that building name.If the information has changed, make the necessary changes.
-
Click the Save button.
The Create New Purchase Order page closes.The new purchase order opens in the Purchase Orders workspace.
 Winning Vendor
If you do not have an approved budget version, selecting a winning bidder will update your budget version.You also cannot choose a winning bidder for a budget version that isn't the published version if a published version exists.
To select the winning vendor:
-
Open the Projects workspace.
-
Select the project for which you want to select a winning vendor.
Read the Filters page and the Collections section of the Common Attributes of Workspaces page to learn how to filter the records in your workspace.
-
Select the Request for Proposal detail section from the Detail Section menu.
-
Select the RFP you want to select a winning vendor for from the field to the left of the Add Vendor button
 .
. -
Click the winning vendor.
-
Click the Winning Vendor button
 in the toolbar on the right side of the Details pane.
The Select a Winner window opens.
-
Enter the rationale for selecting the winner in the Rationale field.
-
Click the Save button.
The Select a Winner window closes.The winning vendor now has a star next to their name.

The winning vendor has a star next to their name.
-
Select the Budget detail section from the Detail Section menu.
The values in the Forecast column have been updated to reflect the costs proposed by the vendor.
-
Adjust the values in the Unit Price column to reflect the costs proposed by the vendor.
-
Click the Save button.
-
Follow the Lock for Approval procedures for the Budget detail section.
-
Follow the Add Approvers and Send for Approval procedures (both are located on the Approvals Procedures page) for the Budget detail section.
Once your budget has been approved, the Create a Purchase Order action activates.To learn how to create a purchase order from the Request for Proposal detail section, follow the procedures above.
 Create RFP
To create a request for proposal (RFP):
-
Open the Projects workspace.
-
Select the project for which you want to create an RFP.
Read the Filters page and the Collections section of the Common Attributes of Workspaces page to learn how to filter the records in your workspace.
-
Select the Request for Proposal detail section from the Detail Section menu.
-
Click the Create button
 in the toolbar on the right side of the Details pane.
The Create RFP window opens.
-
Select the budget version for which you want to create an RFP from the Budget Version field.
-
Select the RFP group from the RFP Group field.
-
Enter the name of the RFP in the Name field.
-
Select the bid type from the Bid Type field.
Examples include verbal bid, sealed bid, written bid, and bid exception.
-
Click the Bid Due Date field and use the Date Picker to select the bid due date.
-
Enter the percentage amount being withheld before the satisfactory completion of the request in the Retention Percent field.
-
Enter the company in the Company type-ahead field.
-
Enter the building in the Building type-ahead field.
This field is typically used in cases where the project has to do with construction.
-
Enter the rentable area in the Rentable Area field.
This field should pre-populate.
-
Select the measurement unit from the Measurement Unit field.
This field should pre-populate.
-
Select the check boxes next to the line items this request for proposal will pertain to from the Available Line Items table.
To select from all available line items, select the Show All check box in the Available Line Items table header.
Important!You must select at least one line item.Line items can only be added to a RFP if they are not already part of another RFP.
-
Choose between two options:
-
Click the Save button.
The Create RFP window closes.Your RFP appears in the Request for Proposal detail section.If you have more than one RFP, you can find all of your RFPs in the field to the left of the Add Vendor button
 .
. -
Click the drop-down arrow next to the Save button and click Save & New from the menu that appears.
The RFP is saved and cleared from view.Repeat steps 5 - 16 until all RFPs are entered.
-
 Edit RFP
To edit a request for proposal (RFP):
-
Open the Projects workspace.
-
Select the project whose RFP you want to edit.
Read the Filters page and the Collections section of the Common Attributes of Workspaces page to learn how to filter the records in your workspace.
-
Select the Request for Proposal detail section from the Detail Section menu.
-
Click the Edit RFP button
 in the toolbar on the right side of the Details pane.
The Edit RFP window opens.
-
Make your changes.
-
Click the Save button.
The updated RFP is saved.
 Rename RFP
To rename a RFP:
-
Open the Projects workspace.
-
Select the project whose RFP you want to rename.
Read the Filters page and the Collections section of the Common Attributes of Workspaces page to learn how to filter the records in your workspace.
-
Select the Request for Proposal detail section from the Detail Section menu.
-
Click the field to the left of the Add Vendor button
 in the toolbar on the right side of the Details pane.
 -
Click the Rename button next to the RFP you want to rename.
The RFP name becomes editable.
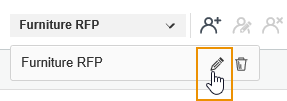
Rename button.
-
Enter the new name in the Name field.
-
Click the Save button next to the Name field.
The RFP name is changed.

Save button.
 Delete RFP
To delete a RFP:
-
Open the Projects workspace.
-
Select the project whose RFP you want to delete.
Read the Filters page and the Collections section of the Common Attributes of Workspaces page to learn how to filter the records in your workspace.
-
Select the Request for Proposal detail section from the Detail Section menu.
-
Click the field to the left of the Add Vendor button
 in the toolbar on the right side of the Details pane.
 -
Click the Delete button next to the RFP you want to delete.
The RFP is deleted.
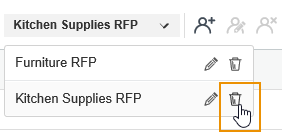
Delete button.
 View RFP
To view the details of a RFP:
-
Open the Projects workspace.
-
Select the project whose RFP you want to view.
Read the Filters page and the Collections section of the Common Attributes of Workspaces page to learn how to filter the records in your workspace.
-
Select the Request for Proposal detail section from the Detail Section menu.
-
Select the RFP you want to view from the field to the left of the Add Vendor button
 .
. -
Click the View RFP button
 in the toolbar on the right side of the Details pane.
The RFP Information window opens.
 Change Currency
The Change Currency action is for comparison only.It doesn't alter the saved values, whereas the currency field for a single vendor indicates which currency their bid is in.
To change the currency on an RFP:
-
Open the Projects workspace.
-
Select the project whose RFP you want to work with.
Read the Filters page and the Collections section of the Common Attributes of Workspaces page to learn how to filter the records in your workspace.
-
Select the Request for Proposal detail section from the Detail Section menu.
-
Select the RFP you want to work with from the field to the left of the Add Vendor button
 .
. -
Choose between two options:
-
To change the currency for an individual vendor:
-
Double-click in the Currency cell of the vendor whose currency you want to change.
-
Select the appropriate currency from the field.
-
Click the Save button.
-
-
To change the currency for the entire RFP:
-
Click the Change Currency button
 in the toolbar on the right side of the Details pane.
The Change Currency window opens.
-
Select the appropriate currency from the Currency field.
-
Click the Save button.
The currency is applied to the RFP.
-
-
